


Understanding Your Ring Doorbell Model
Getting to Know Your Specific Model
When it comes to safely removing your Ring Doorbell, understanding the specific model you have is crucial. Each Ring device comes with distinct features, including different methods of installation, power requirements, and removal processes. Knowing your model helps you gather the right tools and ensure a smooth removal experience. To identify your model, you can check the Ring App where your device is registered. Simply tap on your device within the app's settings to find detailed information. Knowing whether your doorbell is battery-powered or requires a wired connection is also important, as it can impact how you safely disconnect the power. Some models might have a more complex setup, involving security screws or faceplates that require careful handling. Recognizing these components beforehand can prevent potential damage to your device or even your home's facade. For new users who might still be unfamiliar with their Ring Doorbell’s model specifics, exploring a step-by-step guide to effortless setup could shed light on essential features and instructions on how to initially handle your device. This knowledge base will also naturally assist in the removal process, ensuring you approach it with the right level of preparation.Gathering the Necessary Tools
Gathering Tools for Safe Doorbell Removal
To effectively and securely remove your Ring Doorbell, one must have a clear understanding of the required tools. This allows for a smooth removal process and minimizes any risk to your device. Here's a concise guide to help you gather what you need:- Screwdriver: The Ring doorbell typically requires a specific type of screwdriver to detach the device from the wall or door frame. Make sure to use the right fit to avoid stripping the screws.
- Security Screw Driver: Depending on your model, a security screw may protect your doorbell. Have a driver that matches this screw ready for removal.
- Battery Access Tools: If your doorbell includes a battery, ensure you have the tools necessary to access it. Removing the battery is crucial for ensuring safety during the removal process.
- Tap Device Settings: Being prepared with access to the Ring app is also crucial. You may need to adjust device settings or disconnect your ring account for smooth removal.

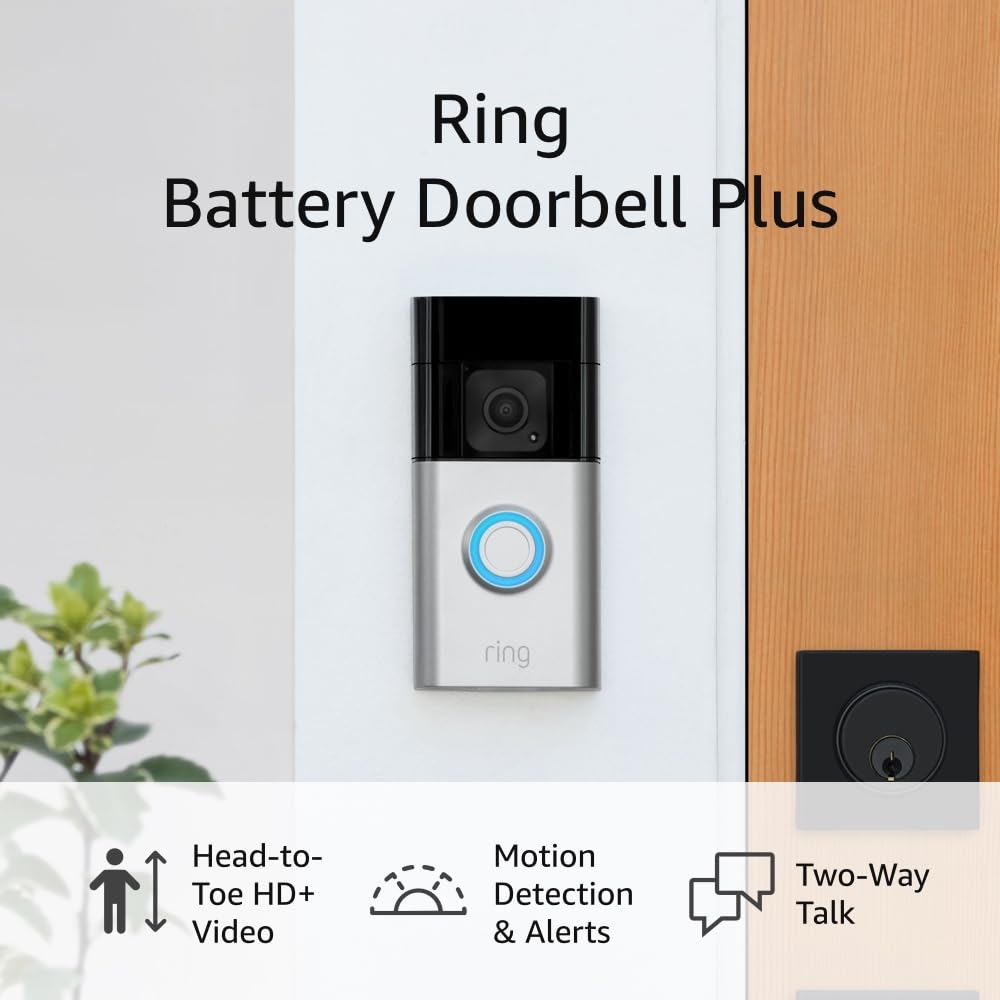
- + Head-to-Toe Video for comprehensive coverage
- + Live View feature for real-time monitoring
- + Two-Way Talk for easy communication
- + Motion Detection & Alerts for enhanced security
- + Stylish Venetian Bronze finish
Safety Precautions Before Removal
Essential Safety Checkpoints Before Detaching
Before moving on to actually remove your Ring doorbell, it’s critical to adhere to specific safety measures. These precautions are pivotal in preventing any potential damage to your device or harm to yourself. Here are some crucial points to keep in mind:
- Power Off the Device: The first step when considering any removal is to disable the power to your doorbell. For Ring doorbells powered by a battery, ensure the battery is fully removed before proceeding. If it's hardwired, switch off the power supply directly from your circuit breaker. This action helps prevent electrical shocks and ensures your safety.
- Deactivate the Camera: Deactivating the video function of your doorbell camera ensures that it does not transmit any video feed during the removal process. Go to your device settings in the Ring app and tap the necessary options to power down your security camera.
- Secure Your Faceplate: Gently inspect the bottom faceplate of your doorbell to confirm it’s firmly attached. Removing the security screw carefully is necessary to prevent scratching the faceplate. Use the appropriate screwdriver to slowly loosen the security screw from the screw bottom while ensuring the doorbell stays in place.
- Handle with Care: Once the security screws are out, it’s essential to maintain a gentle grip on the device to avoid any sudden drops that might damage your doorbell ring camera.
These safety precautions are a testament to maintaining the integrity of both your Ring doorbell and your personal security during any removal process. With these measures in place, you're prepared to move from safety into the actual removal.
Step-by-Step Removal Process
Uninstalling the Ring Doorbell Safely
Now that you've gathered all necessary tools and taken essential safety precautions, it's time to proceed with the removal of your Ring Doorbell. Ensure you have your screwdriver and security screw tool ready.
- Power Off the Device: Before you begin, ensure the ring device is powered off. It’s essential to tap into the device settings via the ring app and select the general settings. Disconnect from any power source to prevent damage during removal.
- Faceplate Removal: Utilize the screwdriver to loosen the screw at the bottom faceplate. Carefully remove the faceplate, ensuring not to apply excessive force to the security camera unit itself.
- Detach the Battery: If your doorbell features a removable battery, detach it. This step is crucial to prevent any accidental power up during the next stages.
- Unscrew the Doorbell: Locate and remove the screws that secure the doorbell camera to the wall. Support the ring video doorbell with your hand as you remove the screws to avoid dropping the device.
- Disconnection from Power: Once unscrewed, gently move the doorbell ring away from the wall and disconnect any remaining power cables or wires if applicable.
- Account and Device Removal: It's crucial to update your ring account post removal. Open the ring app, navigate to your settings, and select the option to remove the device. This step will ensure that, as an owner, your account settings are up to date, maintaining the security of the video doorbell system.
Taking these steps attentively will assure a smooth and secure removal process, ensuring your security cameras remain safe from damage during uninstall.
Handling and Storing the Device
Proper Care and Storage After Removal
Once you've got your ring doorbell in hand, it's essential to handle and store the device with care. After successfully following the removal process, here’s how you should proceed:- Handle with Care: Ensure that you're holding the doorbell securely. Avoid dropping the device as it could damage the sensitive components such as the camera and video sensors.
- Inspect the Device: Examine the ring doorbell for any damage or wear that might have occurred during the removal. Check the ring camera and the faceplate to ensure nothing is cracked or loose.
- Remove Battery (if applicable): If your doorbell is battery-operated, carefully remove the battery. This step prevents any power drain and protects the internal electronics of the device.
- Secure Storage: Place the device in a protective case or an anti-static bag to avoid moisture and static damage. Storing the device in a clean, dry area is crucial for maintaining its longevity.
- Keep Accessories Organized: Collect and store all screws, a screwdriver, and the security screw separately to ensure nothing is lost when you decide to reinstall or relocate your ring doorbell.
- Update Your Settings: Access the ring app and navigate to device settings. Mark the device as temporarily removed or offline in your ring account settings, if applicable.
Troubleshooting Common Issues
Resolving Removal Challenges
Even with the most diligent preparation and careful execution, some users may encounter issues when trying to remove their Ring doorbell. Below are some common difficulties and practical solutions to ensure a smooth experience:
- Security Screw Stuck: At times, the security screw at the bottom of the faceplate can become lodged. Using the appropriate screwdriver is crucial here. Ensure you are using the correct head compatible with the screw. Apply gentle pressure while turning to prevent stripping.
- Faceplate Won’t Detach: If the faceplate seems stuck, double-check that all security screws are fully removed. Occasionally, the fit can be snug. Gently tapping around the edges can help loosen any resistance.
- Device Not Powering Off: Some owners report their device keeps running due to improper power disconnection. Ensure the power is disabled in your device settings before attempting removal. This might involve disconnecting the ring doorbell from an external power source or removing the battery, depending on your model.
- Video Not Deactivating: If the video continues to transmit, access the ring app to confirm the device is offline. In your account settings, navigate to the devices section and verify the feed is not active.
- Camera Recording Continues: Make sure the doorbell camera settings are adjusted to cease recordings before you start with removal. This reduces any unnecessary footage capture during the process.
- Access to Removal Tools: Occasionally, users may misplace tools such as the screwdriver. It's helpful to have a set readily available before beginning any removal tasks, a step highlighted when gathering tools initially.
Addressing these issues promptly ensures that your ring video doorbell is safely removed and efficiently managed, enabling hassle-free handling and storage. Should further complications arise, consulting professional support or specific device documentation is advisable.