Choosing the Right Location
Identifying the Prime Spot for Your Ring Doorbell
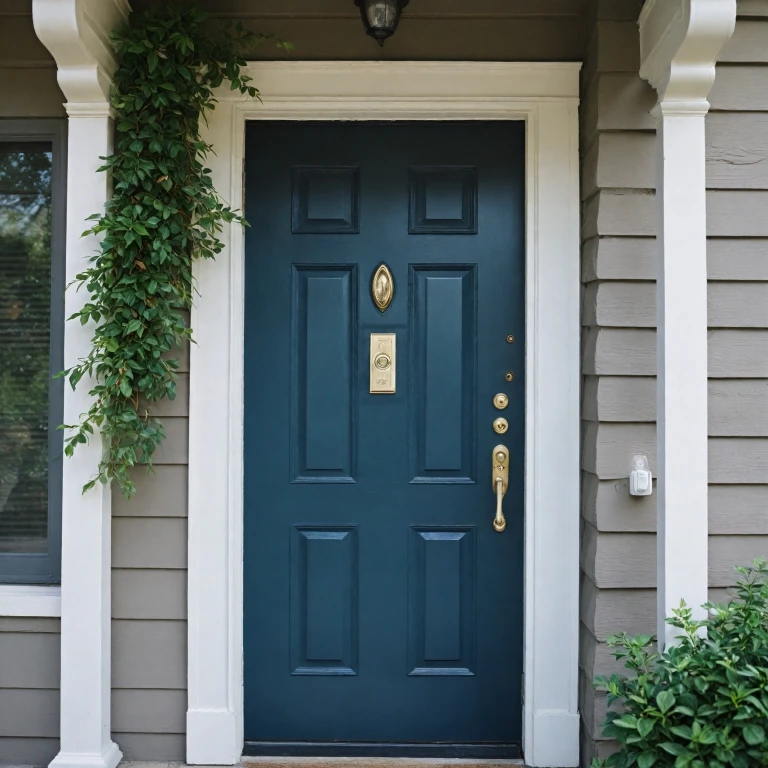
Choosing the right location for your Ring video doorbell is pivotal for maximizing its potential. A well-chosen spot enhances your doorbell's ability to capture clear video footage and ensures seamless integration with your home. Here are a few considerations to keep in mind while selecting the ideal location:- Visibility and Angle: Ensure the doorbell is mounted at a height of approximately 48 inches (122 cm) above the ground. This position is optimal for capturing faces and detailing activities at the front door.
- Wired vs. Battery: Decide whether your doorbell will be battery powered or wired. For a doorbell wired setup, proximity to existing doorbell wires is crucial, while a battery powered device offers more flexibility in placement.
- Proximity to Your Wi-Fi: A strong Wi-Fi connection is vital for your Ring device to function effectively. Before finalizing the spot, test the Wi-Fi strength at your selected location. Weak signals can disrupt your video doorbell’s performance. Need tips? Consider reading about troubleshooting your Ring doorbell's WiFi connection issues.
- Access for Installation: Ensure the chosen site allows ample space for drilling any required pilot holes, mounting the bracket, and comfortably securing the device with the included security screws.
Gathering Necessary Tools and Equipment
Essential Tools and Equipment to Keep Ready
Before you begin mounting your new Ring doorbell, it's crucial to have all necessary tools and equipment at hand. This will ensure a smooth installation process and save time preventing multiple trips in search of items. Here's a checklist of what you need:- Drill and Drill Bits: Using the correct drill bits will help you create pilot holes effectively for the secure mounting of your device.
- Screwdriver: A good Phillips head screwdriver is essential for tightening security screws and securing the mounting bracket.
- Level: Keep your Ring doorbell straight using a level. Many installations fail due to uneven mounting, which can impact video capture.
- Included Mounting Tools: Your Ring device includes certain components like screws, anchors, and security screws to assist with the mounting process.
- Wire Extender: Particularly necessary when installing a wired doorbell in cases where existing doorbell wires might not reach.
- Batteries and Charger: If you're installing a battery powered doorbell, make sure to have the batteries fully charged before mounting.
Mounting the Bracket
Secure the Bracket to Your Wall
The next critical step in installing your Ring Video Doorbell involves securely mounting the bracket to your wall. Before you begin, ensure you have all necessary equipment ready, including your drill, wall screws, and the included ring mounting bracket. Here's a simple guide to follow:- Identify the Best Spot: Once you've determined the ideal location with clear visibility from the previous planning stage, it's important to ensure your Ring Doorbell is mounted at the right height. Generally, it should be at eye level to optimize the camera's video feed of visitors and increase security.
- Mark the Holes: Hold the mounting bracket in position and use a pencil to mark where the pilot holes will go. This helps ensure that the positions align with your existing doorbell setup and wiring.
- Drill Pilot Holes: For smooth and secure installation, use your drill to create pilot holes at the marked spots. This step is essential, especially if mounting on a stucco or brick wall, where the material is harder than standard drywall.
- Attach the Bracket: Using the screws provided in the Ring Doorbell kit, securely attach the mounting bracket to the wall. Tighten security by ensuring the screws are firmly in place. This prevents the bracket from becoming loose over time, guaranteeing a solid foundation for your new doorbell.
Connecting to Your Home's Wiring
Secure Your Ring Device With Proper Connections
Connecting your Ring doorbell to your home's wiring is an essential step in the installation process. This ensures that your video doorbell functions seamlessly without relying on battery power. Here's how you can efficiently connect your device for optimal performance. Start by safely turning off the power to your existing doorbell at the circuit breaker to avoid any electrical hazards. It's crucial to ensure no power flows through the doorbell wires during this process for your safety. Using a screwdriver, remove your current doorbell from the wall. Carefully disconnect the doorbell wires, taking note of which wire connects to each terminal. This will be essential when you attach these wires to your Ring device. Next, guide the doorbell wires through the center opening of the mounting bracket. Once done, you can mount the bracket securely on the wall using the included screws. If you're installing on a harder surface such as brick or concrete, you may need to drill pilot holes to make mounting easier and more stable. Once the bracket is in place, connect the wires to the rear of your Ring doorbell. It doesn't matter which wire connects to which terminal on the doorbell, but ensure they are securely tightened to avoid any connectivity issues. Finally, attach the Ring doorbell to the mounting bracket and tighten with the security screws provided in the package. This ensures that your device remains firmly in place, resisting external tampering. Once the doorbell is securely installed, proceed to set up the Ring app as described earlier. This will allow you to complete the setup process, enabling video and chime functionality as desired. With these steps, your Ring video doorbell should be functioning perfectly, offering you peace of mind and improved security at your front door.Setting Up the Ring App
Launching the Mobile Configuration
Once the ring doorbell is physically installed, it's time to activate and set it up through the mobile interface with the ring app. Begin by downloading the app on your smartphone. It's an essential tool that will guide you in fine-tuning your doorbell’s features and establishing connectivity.
Register and Pair the Ring Device
Upon downloading the app, you’ll need to create an account. If this is your first ring device, setting it up from scratch would be part of the process. For existing users, simply log in and look for an option to add a new device. The app will prompt you to scan a QR code or input the unique code found on your ring video doorbell.
Integrate with Home Network
After successfully recognizing your device, the app will lead you through connecting the ring video to your home Wi-Fi network. This step may ask you to temporarily join a network created by your doorbell before reconnecting to your home Wi-Fi. Make sure your Wi-Fi signal at the front door is strong and reliable for seamless video streaming.
Personalize Alert Settings and Notifications
Enhance your doorbell's utility by adjusting the alert settings. Customize motion detection and set specific zones around your front door where the ring app should send notifications. This feature helps you reduce unnecessary alerts from areas with frequent movement like busy sidewalks.
Synchronize with Existing Chime or Smart Devices
If replacing an existing doorbell, ensure your new ring can chime appropriately. Adjust the settings within the app to use a preferred sound or sync it with other smart home devices. Upload music or tailor the chime to create a personalized welcome sound whenever visitors arrive.
With your video doorbell established in the app, your ring device is prepared. From security tightening options to video monitoring, maximizing its settings empowers your new home security marker.