Planning the installation of cameras for effective home protection
The installation of cameras for a home starts with a clear plan. Before you install any security camera or design larger security systems, define what you want to protect and how you will monitor it. This planning phase reduces blind spots and avoids wasting money on unsuitable systems.
Walk around your property and imagine how an intruder might move, then note potential blind spots where cameras or wireless cameras could provide coverage. Think about entrances, driveways, garages, and shared access paths, because these areas often benefit most from a well placed security camera system. At this stage, placing cameras on a sketch of your home helps you visualise the future video surveillance layout and the field view of each device.
Decide early whether you prefer wired security or a wireless security approach, as this choice shapes every later step. Wired security cameras and wired security systems usually offer more stable video and power, while wireless cameras and battery powered models provide easier installing in difficult locations. Many households combine both systems, using a wired camera system for key zones and wireless security cameras for flexible mounting where running cables is impossible.
Consider how you will store video, because this affects both cost and reliability. A local nvr with a large hard drive offers robust recording for multiple cameras, while some camera systems rely on cloud storage that depends on your internet connection. When you plan the installation of cameras, also think about future expansion so that your chosen security systems can grow with your needs.
Choosing between wired, wireless, and battery powered camera systems
Selecting the right mix of cameras is central to any camera installation. Traditional wired security cameras use cables for both power and video, which can make installing more complex but often improves reliability. In contrast, wireless cameras and battery powered models simplify the installation of cameras but require careful planning for charging and Wi Fi coverage.
For larger security systems, a central nvr connected to a poe switch can power several security cameras through a single network cable each. This type of camera system reduces the number of separate power adapters and keeps cables organised, which is especially useful when installing multiple dome cameras or bullet cameras outdoors. When you install security devices in this way, you gain a cleaner system layout and easier maintenance over time.
Wireless security solutions suit apartments or rented homes where drilling for mounting and cables is restricted. Many wireless cameras now offer high resolution video surveillance, wide viewing angle options, and smart alerts that integrate with mobile apps. However, every wireless security camera still needs reliable power, either from a socket or as a battery powered unit that you must recharge or pair with solar powered security cameras.
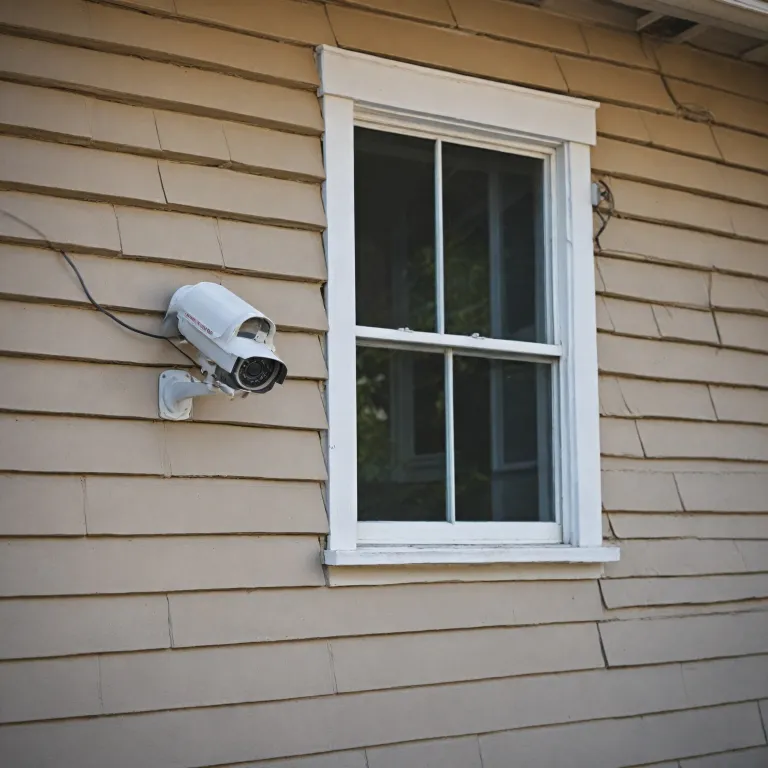
Think about the environment where you will mount each security camera, because weather, dust, and light conditions affect performance. Bullet cameras often suit long corridors or driveways, while dome cameras are discreet and resist tampering in lower mounting positions. Whatever mix of cameras and systems you choose, ensure the installation of cameras follows local laws and respects neighbours’ privacy.
Legal, ethical, and privacy rules for camera installation
Any responsible installation of cameras must respect privacy laws and community expectations. Before you install security equipment, check national and local laws that regulate where a security camera may point and how long you can keep video. Some regions restrict recording of public pavements or neighbouring gardens, so placing cameras requires both legal awareness and courtesy.
When planning security systems, avoid aiming cameras directly at neighbours’ windows or private spaces, even if the viewing angle technically allows it. Instead, adjust the field view so that your security cameras focus on your own entrances, driveways, and shared access points. This careful camera installation still protects your property while reducing the risk of disputes or legal complaints.
Inform household members and regular visitors that video surveillance is in place, especially when cameras cover indoor areas. Clear communication builds trust and helps people understand why you install security measures, how long video is stored on the nvr hard drive, and who can access the system. For outdoor wireless cameras or wired security cameras, visible signs often satisfy legal requirements and can deter intruders before any incident occurs.
Ethical use also extends to how you share or store footage from any camera system. Limit access to your security camera dashboard, secure the nvr and poe switch in a locked area, and use strong passwords for wireless security networks. If you add a solar wireless camera as described in guides to solar wireless security, treat its recordings with the same care as those from wired systems.
Practical step instructions for installing and mounting cameras
A structured guide with clear step instructions makes the installation of cameras more manageable. Start by unboxing each security camera, checking that all cables, mounting brackets, and power adapters are present and undamaged. Then plan the exact mount positions, marking drilling points so that the viewing angle and field view cover entrances without leaving blind spots.
For wired security cameras, run cables from each camera location back to the nvr or router, leaving some slack for adjustments. If you use a poe switch, label both ends of the cables so that each camera system channel is easy to identify later. When installing multiple cameras, this simple step saves time during troubleshooting and helps you expand security systems in the future.
Mount brackets securely using appropriate wall plugs, then attach dome cameras or bullet cameras and gently adjust their angle. For wireless cameras and battery powered units, test Wi Fi signal strength at the mount point before final fixing, because poor connectivity can ruin otherwise good video surveillance. Once all cameras are in place, power on the nvr, connect the hard drive if needed, and follow on screen step instructions to add each security camera.
After basic installing, review live video from every camera to confirm that placing cameras achieved the intended coverage. Adjust the field view and viewing angle to remove blind spots, and fine tune motion detection zones to reduce false alerts. For users who want to record high bitrate video, pairing the system with a reliable storage card such as the one tested in this professional memory card review can further stabilise long term recording.
Optimising camera placement, viewing angle, and system performance
Once the physical installation of cameras is complete, optimisation begins. The way you place each security camera, set its viewing angle, and configure the system software will strongly influence real world security. Poorly adjusted cameras can leave blind spots or capture unusable video, even in advanced security systems.
Position outdoor bullet cameras at around 2,5 to 3 metres high, which balances protection from tampering with a clear field view of faces. Dome cameras under eaves or porches can watch doors without drawing attention, especially when installing them near lighting that improves night video. For wireless cameras and battery powered models, avoid placing cameras behind thick walls or metal structures that weaken wireless security signals.
Use your nvr or app to fine tune motion zones, sensitivity, and recording schedules for every camera system. Continuous recording uses more hard drive space but ensures that no event is missed, while motion based recording suits quieter areas and extends storage for multiple cameras. Regularly review saved video surveillance clips to confirm that the installation of cameras still matches your daily routines and any changes in the environment.
Maintenance is part of long term camera installation success, so schedule periodic checks. Clean lenses, inspect cables for damage, and confirm that the poe switch, nvr, and other security systems components run without overheating. When placing cameras or adjusting systems after renovations, always revisit privacy laws and neighbours’ expectations to keep your security cameras both effective and respectful.
Specific considerations for ring style smart cameras in connected homes
Ring style smart cameras add another layer of complexity to the installation of cameras. These devices integrate with mobile apps, smart doorbells, and wider security systems, so planning must include network capacity and data protection. When you install security equipment of this type, think about how many cameras will share your Wi Fi and whether your router can handle the video load.
Because many ring style devices are wireless cameras or battery powered units, placing cameras near reliable signal sources is essential. Test the viewing angle and field view from your phone while standing at the planned mount point, then adjust until blind spots are minimised. Some households combine these smart cameras with a traditional nvr based camera system, using wired security cameras for continuous recording and wireless security devices for smart alerts.
Smart security camera models often store video in the cloud rather than on a local hard drive. This arrangement simplifies physical camera installation because fewer cables and no poe switch are required, but it increases reliance on stable internet and strong passwords. Regularly update firmware, review app permissions, and follow manufacturer guidance to keep your security cameras resilient against digital threats.
In connected homes, laws and ethical expectations still apply, especially when video surveillance covers shared hallways or communal entrances. Inform guests that a camera system is active, and avoid sharing clips publicly unless necessary for safety or law enforcement. With thoughtful planning, careful installing, and ongoing maintenance, the installation of cameras in a smart home can enhance security without sacrificing privacy or neighbourly trust.
Key statistics about home camera installation and security
- Up to 60 % of residential burglaries occur through poorly monitored doors and ground floor windows, highlighting the value of placing cameras at main entrances.
- Households that install security cameras and alarm systems report around 30 % fewer successful break ins compared with similar homes without video surveillance.
- More than 70 % of new home security systems now include at least one wireless camera or battery powered device, reflecting a shift away from fully wired security.
- Properly configured motion detection can reduce unnecessary video recordings by 40 % while still capturing relevant security events.
- Regular maintenance of cameras, cables, and nvr storage extends the effective lifespan of a camera system by an estimated 3 to 5 years.
Common questions about the installation of cameras
Where should I place cameras for the best home security ?
Prioritise main entrances, back doors, and ground floor windows when placing cameras. A security camera above each access point with a clear viewing angle usually removes major blind spots. Complement these with one or two cameras covering driveways or shared paths to complete the system.
Is wired security better than wireless cameras for home use ?
Wired security cameras generally provide more stable power and video, which suits continuous recording on an nvr and hard drive. Wireless cameras and battery powered models are easier to install security equipment in rented homes or finished interiors. Many people choose a hybrid camera system that combines both wired and wireless security devices.
How high should I mount outdoor security cameras ?
Mount outdoor cameras at about 2,5 to 3 metres above ground level. This height protects the security camera from easy tampering while keeping the field view clear enough to capture faces. Adjust the viewing angle after installing to ensure there are no blind spots near doors or windows.
Do I need an nvr and poe switch for a small home camera installation ?
For one or two cameras, a standalone wireless camera or simple recorder may be enough. An nvr with a poe switch becomes more useful when installing several wired security cameras that need central power and video management. It simplifies cables, improves reliability, and scales better as your security systems grow.
What legal issues should I consider before installing cameras ?
Check local laws about recording public areas, shared spaces, and neighbours’ properties before any camera installation. Aim your security cameras mainly at your own entrances and paths, and avoid windows or private gardens that are not yours. Inform residents and visitors that video surveillance is active to maintain transparency and trust.