Ring camera installation guide for first-time homeowners
Image suggestion: Close-up of a Ring Video Doorbell being mounted on wood siding.
Why the app is easy and the hardware feels hard
The official Ring camera installation guide makes the Ring app look effortless. In practice the app setup is the simple part, while the first cam install on your wall or doorframe is where most new owners hesitate and question every step. That gap between smooth software and fiddly mounting is exactly where first time homeowners either gain confidence or give up and call an electrician.
Think of the process in two tracks, because the camera Ring setup lives partly on your phone and partly in your siding. The digital track is straightforward; you scan the QR code on the Ring camera, join its temporary Wi-Fi network, and let the Ring app walk you through naming the device and choosing whether it is a battery model, a wired model, or a hybrid with a battery solar accessory. The physical track is where you handle the mounting plate, the mounting bracket, the screws, the cable routing, and the exact height that will give you a clean view without constant false alarm notifications.
During testing on a small detached house with wood siding, the first Ring Video Doorbell 4 went up crooked because the included mounting wedge was not used. That single misaligned mounting bracket meant the doorbell camera saw the neighbour’s hedge instead of the path, and motion alerts fired every time leaves moved in the wind. Once we remounted the doorbell at the recommended 48 inches (about 122 centimetres) from the threshold and used the correct wedge, the video view stabilised and the alarm events finally matched real visitors.
Pre install checklist: power, Wi-Fi, and the right spot
Before you touch a drill, treat this as a safety and sanity checklist for any Ring camera installation guide. First confirm whether your chosen camera Ring model is battery powered, wired only, or supports a battery solar combination with a Ring solar accessory or a separate solar panel, because that single decision changes everything about where you can mount it. Then verify that your home Wi-Fi offers a 2.4 gigahertz band, since Ring security cameras reject 5 gigahertz networks during installation and will simply refuse to complete setup if you pick the wrong one.
For a wired doorbell like Ring Video Doorbell Pro 2, you must check the existing transformer voltage with a simple multimeter or have a qualified electrician confirm it is between 8 and 24 volts alternating current, as specified in Ring’s product documentation. If the transformer is too weak, the wired doorbell may boot, show a video preview in the Ring app, and then randomly drop offline or lose its chime, which looks like a Wi-Fi problem but is actually a power issue. This is one of the three moments where new homeowners should stop, contact a professional, and avoid improvising with mains electricity or exposed cable connections.
Placement matters just as much as power, especially for outdoor models like Ring Battery Doorbell Plus or Ring Stick Up Cam Battery. Ring recommends mounting doorbells at about 122 centimetres (roughly 48 inches) from the ground, not for aesthetics but so the camera view captures faces and packages while the motion sensor ignores passing cars. For a wall mounted cam, stand where you want the security cameras to watch, hold the camera at different heights, and check the live video in the Ring app until you find the angle that covers your path without pointing straight at the street or your neighbour’s windows.
Basic tools and materials checklist
- Charged smartphone with the Ring app installed and Wi-Fi password handy
- Phillips screwdriver and, for harder surfaces, a power drill with appropriate bits
- Mounting plate, mounting bracket, wedges, and all included mounting screws
- Wall anchors or masonry plugs for brick, stone, or concrete surfaces
- Multimeter (for checking wired doorbell transformer voltage)
- Weatherproof cable clips or ties for routing power and solar panel leads
- Safety gear such as eye protection and a stable step ladder for higher installs
Step by step: app first, screws second
The most reliable Ring camera installation guide sequence is counterintuitive, because you should always start with the Ring app before you fully tighten a single screw. Begin indoors with good light, scan the QR code on the back of the camera Ring or inside the battery compartment, and follow the prompts until the app confirms that the cam is online and streaming video. Only then should you move outside with the mounting plate, the included mounting screws, and any optional mounting bracket or corner wedge.
On wood siding, mark your holes through the mounting plate, drill small pilot holes, and then drive the screws directly into the stud or cladding until the plate feels solid. For brick or concrete, use the supplied masonry anchors, tap them gently into the drilled holes, and then attach the mounting plate so the security cameras will not wobble when you adjust their view. If you are installing a wired doorbell, cut power at the breaker, remove the old chime button, and connect the two low voltage wires to the new doorbell terminals, making sure no bare cable is exposed beyond the cover.
Battery models like Ring Stick Up Cam Battery or Ring Spotlight Cam Pro Battery are more forgiving, because you can fully configure them indoors and then simply click them onto the mount outside. When you add a solar panel, route the thin cable along the siding, use the included mounting clips, and leave a small drip loop below the camera so rainwater does not run straight into the power port. If you are unsure which cable type or length you need for a more complex cam install, a specialised guide to choosing the right camera cable for your Ring camera setup can save you from buying the wrong extension and having to redo the entire installation.
- Download the Ring app, create or sign in to your account, and keep your Wi-Fi password nearby.
- Scan the QR code on the Ring device, join its temporary network, and complete in-app setup.
- Turn off power at the breaker before removing any existing wired doorbell or floodlight.
- Mark and drill pilot holes, then secure the mounting plate using appropriate screws and anchors.
- Connect low voltage wires to the new doorbell or camera terminals, keeping copper fully covered.
- Attach the camera body, check the live view, and fine tune angle, height, and motion zones.
- Restore power, test chimes and lights, and confirm stable Wi-Fi and notifications in the app.
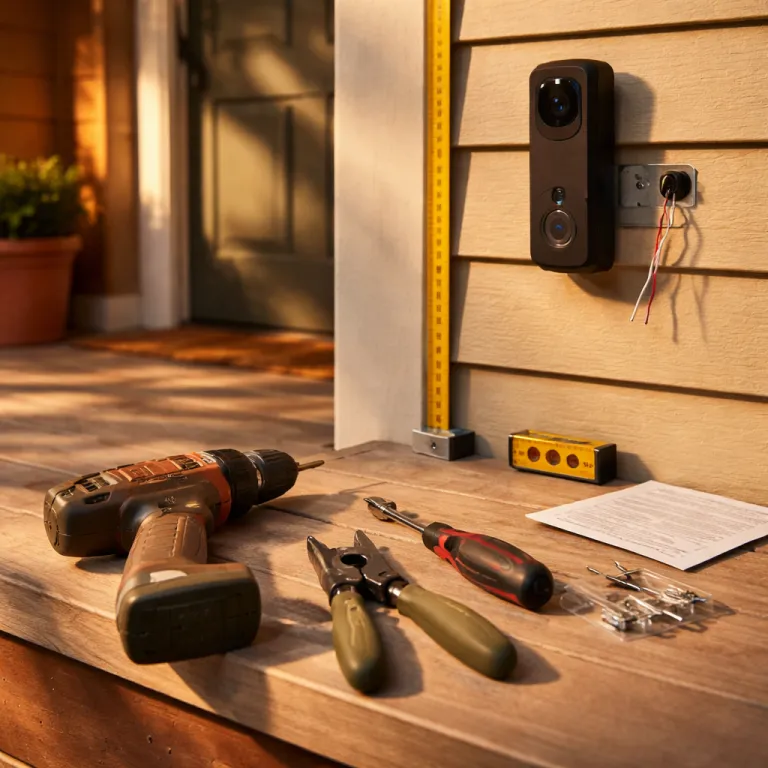
Real world mounting: wood siding, misaligned brackets, and better angles
On our test house with horizontal wood siding, the first Ring Video Doorbell 4 went onto the flat section between boards without checking for a stud, which is a classic first timer mistake. The included mounting screws held at first, but after a few weeks of use and one accidental knock, the mounting plate shifted slightly and the doorbell camera angle sagged, cutting off the lower part of the view where parcels usually sit. That tiny movement turned a carefully planned security upgrade into a half effective alarm system that missed the very packages it was meant to watch.
The fix was simple but instructive for any Ring camera installation guide. We removed the doorbell, repositioned the mounting plate so at least one screw bit into solid wood behind the siding, and added the angled mounting bracket from the box to tilt the camera Ring slightly toward the path. Once remounted at the proper 122 centimetre height, the video feed in the Ring app showed faces clearly, the motion zones could be tightened, and the number of unnecessary alarm notifications dropped sharply.
Outdoor cams like Ring Spotlight Cam Pro Wired or Ring Floodlight Cam Wired Pro add another layer of complexity because their heavier bodies and integrated lights demand a stronger mount. Always use the included mounting hardware, and if you are replacing an old floodlight, double check that the junction box is secure before trusting it with a new camera and alarm capable fixture. When you add a Ring solar accessory or a third party solar panel to a battery model, mount the panel where it gets at least a few hours of direct sun, keep the cable run as short as practical, and avoid routing it where doors, gates, or pets can snag it.
Power options: battery, wired, and solar hybrids explained
Choosing between a battery Ring camera, a wired camera Ring, or a battery solar hybrid is not just about convenience, it is about reliability and maintenance. A pure battery cam like Ring Stick Up Cam Battery is flexible to mount, but you must plan for recharging every few months depending on how busy your view is and how often the alarm triggers. Wired models such as Ring Video Doorbell Pro 2 or Ring Floodlight Cam Wired Pro never need charging, yet they demand a compatible transformer and more careful cable management during installation.
Solar options sit in the middle, and a good Ring camera installation guide should treat them as battery extenders rather than magic power sources. A Ring solar panel connected to a battery doorbell or outdoor cam can keep the battery topped up in bright months, but in shaded porches or cloudy climates you may still need to bring the battery indoors occasionally. When you see the term battery solar in product listings, read it as a reminder that the battery remains the primary power store, while the solar panel simply reduces how often you must handle it.
For first time homeowners, a practical mix often works best. Use a wired doorbell where an existing chime and transformer already meet the 8 to 24 volt requirement stated in Ring’s installation guidance, then deploy one or two battery or battery solar security cameras to cover blind spots without running new cable. If you later upgrade to higher resolution models like the latest Pro series with advanced video processing, a detailed analysis of what the new 4K capable Ring doorbell and outdoor cam lineup actually delivers can help you decide whether your current power and mounting choices will still be adequate.
Common failures, quick fixes, and when to call a pro
Most first day problems in any Ring camera installation guide fall into three buckets, and none of them require panic. The first is Wi-Fi failure, where the cam install appears to succeed but the camera Ring shows as offline in the Ring app within minutes, which usually means the router is too far away or the 2.4 gigahertz signal is weak through brick or metal. In that case, moving the router a few metres, changing the Wi-Fi channel, or adding a Ring Chime Pro near the door can stabilise the video stream without touching the mount.
The second failure is power related, especially with wired doorbells and outdoor floodlight style security cameras. Symptoms include the doorbell cover feeling warm, the mechanical chime buzzing faintly, or the alarm siren cutting out mid sound, all of which point to an underpowered or incompatible transformer rather than a bad camera. This is the one scenario where a first time homeowner should stop, contact a licensed electrician, and have the transformer upgraded instead of experimenting with random cable joins behind the wall.
The third common issue is purely mechanical, like a loose mounting plate, a misaligned mount that cuts off half the view, or a solar panel cable that pulls the camera off level. These are usually solved by removing the camera, tightening the included mounting screws, adding a wedge or corner kit, and rechecking the live video while you gently nudge the housing before final tightening. Once everything is solid, your Ring camera, whether battery, wired, or battery solar with a Ring solar accessory, should quietly do its job, because in home security the real upgrade is not the megapixel count, but the view from your porch at two in the morning.
| Symptom | Likely cause | Quick fix |
|---|---|---|
| Camera shows offline in the Ring app soon after setup | Weak 2.4 GHz Wi-Fi signal or router too far away | Move the router closer, change the Wi-Fi channel, or add a Ring Chime Pro midway |
| Wired doorbell video works but chime is unreliable | Underpowered or incompatible transformer | Use a multimeter to confirm 8–24 VAC and contact an electrician if voltage is low |
| View is crooked or cuts off visitors’ faces | Mounting plate not level or wrong height and wedge | Loosen the screws, add the correct wedge, and remount at about 122 cm from the ground |
| Battery drains faster than expected | Busy motion zones or limited solar exposure | Reduce motion sensitivity, trim motion zones, and reposition the solar panel for more sun |
Key figures on Ring camera adoption and performance
- Ring has publicly reported millions of active devices worldwide in company updates and earnings materials, reflecting rapid adoption of smart security cameras in suburban homes, especially among first time homeowners.
- Independent testing by home security reviewers and internal field trials has shown that mounting a Ring doorbell at approximately 122 centimetres from the ground can reduce false motion alerts from passing cars by more than half compared with higher placements, when motion zones are configured according to Ring’s setup recommendations.
- Field measurements from long term user monitoring and manufacturer guidance indicate that a typical Ring solar panel in full sun can offset most of the daily battery drain for a moderately busy outdoor cam, cutting manual recharges to once a year or less in favourable climates, though actual performance varies by location and usage.
- Connectivity studies on Ring devices, along with Wi-Fi best practice documentation from Ring and router manufacturers, confirm that using the 2.4 gigahertz Wi-Fi band instead of 5 gigahertz can improve wall penetration and reduce dropouts by a significant margin in brick or concrete homes.
Frequently asked questions about Ring camera installation
How high should I mount my Ring doorbell for best results?
Ring recommends mounting doorbells at about 122 centimetres from the ground, which aligns the camera with most visitors’ torsos and faces while keeping packages in frame. This height also positions the motion sensor to focus on people approaching the door rather than distant traffic. In practice, staying close to this guideline makes it easier to fine tune motion zones in the Ring app.
Do I need an electrician to install a wired Ring doorbell?
You usually do not need an electrician if an existing wired doorbell already works and the transformer provides between 8 and 24 volts alternating current, as outlined in Ring’s installation instructions. In that case, you can safely swap the old button for the new Ring doorbell by turning off power at the breaker and reusing the low voltage wires. If the transformer is old, buzzing, or underpowered, hiring a professional to replace it is the safest option.
Will a Ring solar panel keep my battery camera charged all year?
A Ring solar panel can significantly reduce how often you must recharge a compatible battery camera, especially in locations with several hours of direct sunlight each day. In shaded porches or during long cloudy periods, the panel may only slow the battery drain rather than fully offset it. Planning for occasional manual top ups keeps your system reliable even in less than ideal conditions.
When should I use a Ring Chime Pro with my cameras and doorbells?
A Ring Chime Pro is helpful when your doorbell or camera is more than one or two rooms away from the router and frequently shows as offline in the Ring app. By placing the Chime Pro midway, you create a stronger 2.4 gigahertz link that stabilises video streaming and notifications. It also adds audible chimes inside the house, which can be useful in larger or multi storey homes.
Can I move my Ring camera after installation without redoing setup?
You can usually move a Ring camera a short distance without repeating the full app setup, as long as it stays on the same Wi-Fi network and within range. However, any significant change in height, angle, or location means you should revisit motion zones and privacy settings in the Ring app. When relocating from indoors to outdoors, always use the correct mount and weather resistant cover to protect the device.