Why ring floodlight cam setup feels harder than it is
The ring floodlight cam setup looks intimidating because it touches mains power. For most smart home enthusiasts, the real anxiety comes from opening the existing junction box and seeing a tangle of wire colors that do not match the neat diagrams in the Ring app. Once you understand how the floodlight wiring works in older homes, installing Ring becomes a predictable sequence instead of a guessing game.
When you unbox a new Ring Floodlight Cam Wired Plus or Pro, the device itself is rarely the problem. The challenge is that the mounting bracket and foam gasket are designed for a modern round exterior box, while many houses still have shallow metal boxes or weathered siding blocks that twist the mounting screws off center. That mismatch is why the mounting step, not the smart features, will decide whether your install set feels clean or like a compromise.
Think of this as two projects that must connect smoothly. First, you make the electrical box safe and ready for installing floodlight hardware with a secure ground wire and solid wire nuts. Then you handle the smart side, where the Ring app, Wi-Fi network, and other Ring devices all need careful setting adjustments so the lights and camera behave the way you expect.
Tools, safety, and the circuit breaker test you cannot skip
Before touching any ring floodlight cam setup wiring, you need a clear plan and the right tools. At minimum, that means a non contact voltage tester, insulated screwdriver, combination pliers, wire stripper, exterior grade silicone, and the long screws and anchors that are usually included in the box with the Ring device. If you already own other Ring devices such as a Ring Doorbell Pro, treat this as a higher stakes version of that project, not a totally new skill.
Start at the service panel and switch off the circuit breaker you believe controls the old floodlight or porch lights. Then walk back to the fixture and use the voltage tester on every exposed wire and metal edge, because mislabeled breakers and shared circuits are common in older construction and will surprise even confident DIYers. Only when the tester stays silent on the line, neutral, and ground wire should you move to the next step of removing the old light and loosening the mounting bracket.
Once the power is confirmed off, photograph the existing wire layout before disconnecting anything. That quick snapshot will save you if the color coding in the box does not match the standard black line, white neutral, and bare or green ground wire pattern described in the Ring app diagrams. If you feel any doubt about the circuit breaker labeling, or if the tester still shows power on a wire, stop and call a licensed electrician rather than forcing an unsafe install.
For readers comparing projects, a detailed guide to an advanced wired doorbell such as the Ring Doorbell Pro can be helpful as a reference for transformer sizing and low voltage behavior, and you can find that kind of informed buyer overview in a dedicated Ring Doorbell Pro explained resource that focuses on what experienced installers actually check before committing to a new ring device.
The wiring step that trips up first time DIY installers
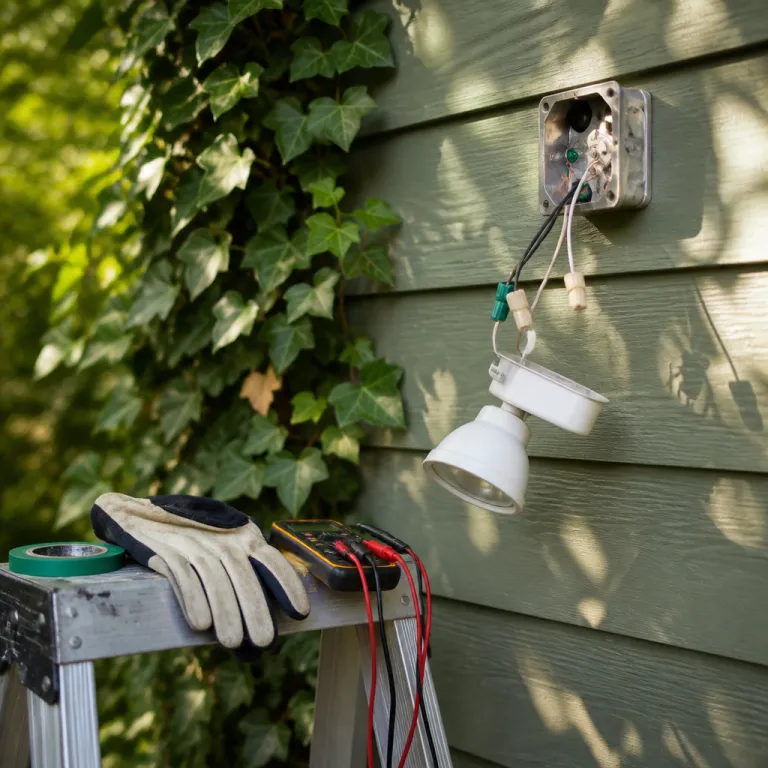
The most stressful part of any ring floodlight cam setup is translating the wiring chart into the messy reality inside your exterior box. In modern North American homes, the rule of thumb is simple enough, with the black wire carrying line power from the switch, the white wire acting as neutral, and the green or bare copper wire serving as the safety ground wire. Older houses, multi way switches, and previous DIY repairs break that neat pattern, which is why so many first time installers stall at this step.
When you are installing Ring Floodlight Cam on a box that has only two wires and no obvious ground, you must slow down and identify each conductor rather than guessing. A non contact tester and a simple continuity check at the switch can reveal which wire is always hot, which is switched, and whether the metal box itself is bonded and can accept the green ground wire from the mounting bracket. If you see red wires, bundled neutrals, or wire nuts crammed deep in the box, treat that as a sign that a previous floodlight or other device was spliced in, and label each conductor before you disconnect anything.
Ring’s own diagrams assume you will connect the black fixture lead to the house line, the white fixture lead to the neutral bundle, and the green fixture lead to either a bare copper ground or the grounded metal box. That works perfectly when the existing install set was done to code, but it fails when someone used the white wire as a switched hot without marking it, which is common in older floodlight installs. If you cannot clearly match each wire to its role, or if the circuit breaker never fully kills power to the box, the safest move is to pause the install and bring in a professional rather than forcing the mounting bracket into place over questionable wiring.
Before you even pick a mounting location, it helps to think about your entire property layout and how this floodlight will overlap with other Ring devices, and a planning guide on mapping your property before you mount anything can save you from installing floodlight hardware in a spot that later forces you to buy extra cameras you did not really need.
Mounting bracket ergonomics, foam gasket, and weather sealing
Once the wiring is sorted, the physical mounting can still make or break your ring floodlight cam setup. The included mounting bracket and foam gasket are designed for a flat, rigid surface, yet many stucco or clapboard walls flex and crumble around the screws. That mismatch leads to wobbly installs where the device never sits flush, and the lights vibrate in the wind or during minor impacts.
Dry fit the mounting bracket against the box before you commit to installing floodlight hardware. If the foam gasket does not fully compress against the siding, or if the long screws bottom out before the bracket feels tight, you may need shorter screws or plastic spacers to bridge the gap without bending the bracket. On rough stucco, a thin bead of exterior silicone around the top and sides of the foam gasket can compensate for the uneven surface and keep water from tracking into the box, while still allowing you to remove the install set later if you upgrade to a newer Ring device.
Pay attention to how the camera head and floodlight arms articulate once the body is on the bracket. You want the lights aimed to cover the driveway or yard without shining directly into neighbors’ windows, and you want the camera angled so the motion zones in the Ring app can see faces rather than just the tops of heads. If you are a renter or cannot drill new holes, a separate guide on no drilling Ring cameras that a renter can actually install is worth reading, because it explains how to combine clamp mounts and existing boxes without violating lease terms.
Pairing the ring device, Wi Fi pitfalls, and 3D Motion Detection
With the hardware secure, the next ring floodlight cam setup hurdle is digital rather than physical. The Ring app walks you through scanning the QR code, joining the temporary setup network, and then telling the device which Wi Fi to use. Most pairing failures happen because the phone silently reconnects to a 5 GHz network while the floodlight only accepts 2.4 GHz during the initial connect step.
To avoid that loop, temporarily force your phone onto the 2.4 GHz SSID before you start installing Ring hardware, or move far enough from the router that the 5 GHz band drops out. Once the app confirms that the ring device has joined your network and the status lights flash as described, you can move on to setting motion zones, schedules, and linked actions with other Ring devices. If the app stalls or the device never appears online, cycle the circuit breaker off for thirty seconds, restore power, and repeat the setup, because a clean reboot often clears partial firmware updates that block the install set from finishing.
On Ring Floodlight Cam Pro models, 3D Motion Detection and Bird’s Eye View are powerful but over aggressive at factory defaults. Start by drawing a modest motion map in the Ring app that covers only the driveway or path you care about, then gradually extend it once you see how the device reacts to cars, pets, and tree shadows. If you leave the default sensitivity and distance untouched, the lights and alerts will trigger constantly, and you will train yourself to ignore notifications, which defeats the point of installing floodlight security in the first place.
Post install checks, testing routines, and when to call an electrician
After a ring floodlight cam setup looks finished, you still need to prove that it works the way you expect. Start with a simple checklist while the circuit breaker is on and the Ring app is open, confirming that the camera live view loads quickly, the lights respond to manual toggles, and the siren or speaker functions behave as described. Then walk through at least ten different motion paths, including straight toward the device, across the field of view, and at the edges of your property, to see how the mounting angle and motion zones interact.
If any test path fails to trigger the lights or recording, adjust the mounting bracket tilt and the motion zone sliders in the app rather than immediately blaming the hardware. Sometimes raising the device by just a few centimeters or rotating it a few degrees will change how the smart motion algorithm interprets people versus cars, especially when other Ring devices are linked to start recording when one camera sees movement. Use the event history to confirm that each test step created a clip, and if you notice gaps or repeated false alerts, refine the setting profiles for day and night separately.
There are clear signs that you should stop troubleshooting and call a professional. If the metal housing tingles when touched, if the lights flicker when other appliances start, or if the breaker trips repeatedly after installing Ring hardware, those are all indicators of deeper wiring issues in the box or upstream. A licensed electrician can correct undersized conductors, missing ground wire connections, or corroded junctions, leaving you to focus on the smart home side of the install set instead of worrying about basic electrical safety.
Key figures on ring floodlight cam setup and home security
- According to Ring’s published specifications, most Ring Floodlight Cam models draw roughly 20 to 25 watts in normal operation, which is significantly less than many legacy halogen floodlight fixtures that can exceed 150 watts for similar brightness levels.
- Consumer surveys from major home improvement retailers have reported that a large share of DIY smart camera returns are due to installation difficulties, with wiring confusion and breaker identification listed as leading causes compared with actual device defects.
- Industry data from residential security studies indicates that visible exterior cameras and lights can reduce opportunistic break in attempts, especially when motion activated lights cover main entry points such as driveways, side gates, and back doors.
- Wi Fi troubleshooting statistics from networking vendors show that 2.4 GHz bands still offer better range through walls than 5 GHz, which explains why many smart floodlight cameras rely on 2.4 GHz for initial setup and long term stability in detached garages or exterior walls.
FAQ about ring floodlight cam setup
Do I need an existing junction box to install a Ring Floodlight Cam ?
Yes, Ring Floodlight Cam models are designed to mount to a standard exterior junction box, and the included mounting bracket, foam gasket, and long screws assume that a properly grounded box is already in place. If you do not have one, an electrician can add a weather rated box and run a new circuit that meets code. Surface mount boxes and siding blocks are common solutions when upgrading from a simple wall sconce to a heavier smart floodlight device.
Can I complete a ring floodlight cam setup without turning off the circuit breaker ?
No, you should always switch off the correct circuit breaker and verify with a non contact voltage tester before touching any wire in the box. Working on live mains power is dangerous even for experienced electricians, and a smart home enthusiast should never rely on a wall switch alone to cut power. The extra minute spent confirming that the line, neutral, and ground wire are all de energized is non negotiable for a safe install.
Why does my Ring Floodlight Cam only connect to 2.4 GHz Wi Fi during setup ?
Most Ring Floodlight Cam models use 2.4 GHz Wi Fi because it offers better range through exterior walls and over driveways than 5 GHz, especially when the router is inside the house. During the initial ring floodlight cam setup, your phone must temporarily connect to the device’s own setup network, which can be disrupted if the phone keeps jumping back to a 5 GHz home network. Locking your phone to the 2.4 GHz SSID until the Ring app confirms a successful connection usually prevents this problem.
How weatherproof is the foam gasket and mounting bracket on stucco walls ?
The included foam gasket and mounting bracket are rated for typical exterior use, but they seal best against flat, rigid surfaces such as modern siding blocks or smooth masonry. On rough stucco or uneven brick, small gaps can remain around the screws or edges, so many installers add a thin bead of exterior silicone along the top and sides after tightening the bracket. This helps keep water out of the box while still allowing future removal of the install set if you replace the ring device later.
When should I call an electrician instead of finishing the install myself ?
You should bring in a licensed electrician if the voltage tester still shows power after you flip the suspected circuit breaker, if there is no obvious ground wire or bonding in the box, or if the breaker trips repeatedly once the floodlight is wired. Signs such as flickering lights, warm wiring, or tingling metal parts also indicate deeper electrical issues that go beyond a typical DIY ring floodlight cam setup. A professional can correct those problems safely, leaving you to handle the smart configuration in the Ring app and the integration with other Ring devices.